In addition to the instructions below, you can watch demos recorded from our live webinar on how to participate in round 2 of the challenge and how to share your challenge code.
- Register as a team
- Create your individual account
- Download pre-processed data
- Run tractography
- Post-process your results
- Upload your post-processed tractography volumes
- Finalize your submission
Register as a team
All aspects of the challenge (download of diffusion MRI data, upload of tractography results, scoring and ranking) will run on the QMENTA platform. Before you and your teammates create your accounts on the platform, please request challenge-specific access codes for your team. If you create an account without a code, it will not be set up properly for the challenge.
Create your individual account
On the QMENTA platform, click on the Register button on the top right corner of the log-in page. Enter your name, email address, and password. In the Promotional Code field, use one of the single-use access codes sent to your team. Accounts created with your team’s access codes will have access to each other’s data on the platform.
Download data
Read more on data acquisition and q-space resampling >
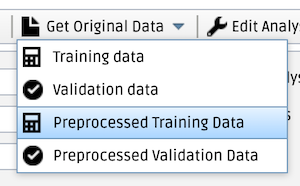
Make sure that IronTract is selected as the current project on the Projects tab. Open the My Analysis tab by clicking on the beaker icon in the sidebar on the left of the page. Click on Get original data in the top bar. From the drop-down menu, select Preprocessed Training Data to get the training case and then Preprocessed Validation Data to get the validation case. (Note that, in Round 2, we are harmonizing the pre-processing among all teams, i.e., everyone is using the same pre-processing as the team that scored highest in Round 1. Thus, for Round 2, you need to download the pre-processed data. The unprocessed data are still available for download from the Training data and Validation data options of the drop-down menu. However, we are NOT using these for Round 2.)
In the pop-up window, check the checkboxes next to the files that you want to download, and click on Download selected.
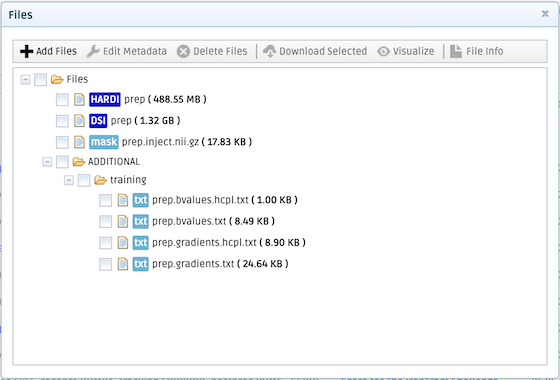
The available files are described below:
- DSI prep: Diffusion MRI data acquired on a Cartesian lattice in q-space and pre-processed. You can find the corresponding b-values (prep.bvalues.txt) and gradient vectors (prep.gradients.txt) under ADDITIONAL.
- HARDI prep: Diffusion MRI data resampled on two q-shells and pre-processed. You can find the corresponding b-values (prep.bvalues.hcpl.txt) and gradient vectors (prep.gradients.hcpl.txt) under ADDITIONAL. This corresponds to the acquisition scheme of the HCP lifespan and HCP disease studies (with b-values adjusted to account for the 4x factor required to achieve the same diffusion contrast in a fixed brain).
- prep.inject.nii.gz: The seed region for tractography, i.e., the site of the injection in diffusion MRI space.
For the general competition, you can you use the DSI or q-shell data sets. For the HCP competition, you have to use the q-shell data sets. You can participate in one or both competitions.
Run tractography
If you participated in Round 1, please submit results with the same orientation reconstruction and tractography methods that you used in Round 1. If you are a new participant, you can use any orientation reconstruction and tractography method of your choice. (Both previous and new participants must use the new, harmonized pre-processing, post-processing, and seed region.)
Post-process your results
In Round 2, we are harmonizing the post-processing among all teams, i.e., everyone is using the same post-processing as the two highest-scoring teams from Round 1. We will provide scripts and other files necessary for this after you register. We are asking you to submit results separately for each of these two post-processing approaches:
- Post-processing 1 (spatial filtering, from EPFL team): There is a script for this (compute_density_volumes_EPFL.py). If your tractography method saves .trk files, you can use the script as is. If your tractography method outputs tract volumes, you will have to apply the first step (length thresholding) on the fly in your own tractography code, and you can then use the rest of the script (filtering and thresholding of tract volumes) directly on your output volumes.
- Post-processing 2 (anatomical ROIs, from VUMC team): There is a script (compute_density_volumes_VUMC.py) and two inclusion masks (one mask for training case, one mask for validation case). If your tractography method saves .trk files, you can use the provided script to apply the inclusion masks. If your tractography method outputs tract volumes, you will have to apply the inclusion masks on the fly in your tractography code. You can then use the rest of the script (thresholding of tract volumes) directly on your output volumes.
Upload your post-processed tractography volumes
Each post-processing script will generate multiple NIfTI volumes for each submission, corresponding to different threshold levels, i.e., different operating points along the ROC. You need to upload all of these volumes. Please make sure that the resolution, matrix size, and orientation information in the header of your tractography volumes matches that of the diffusion MRI volumes that you downloaded.
Make sure that IronTract is selected as the current project on the Projects tab. Open the My Analysis tab by clicking on the beaker icon in the sidebar on the left of the page. Click on Upload results in the top bar. From the drop-down menu choose Training data or Validation data, depending on the case for which you are uploading results.
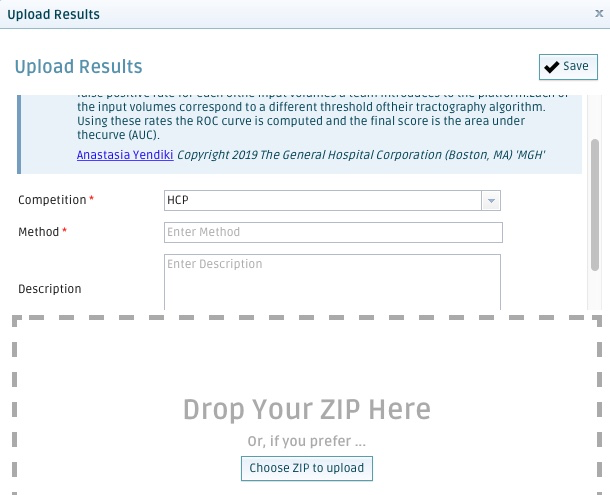
In the pop-up window, choose whether you want to upload your results for the HCP or the Overall ranking from the Competition pull-down menu. In the Method field, please provide a name for the method you used (e.g. probabilistic CSD); this will be the name of your analysis and allow you to distinguish between different methods that you enter in the competition. For the moment, you do not need to enter anything in the Description field. Include all the NIfTI volumes produced by this method at all the different thresholds in a single zip file. Click on the Choose a ZIP to upload button and select this zip file. Click on the ✓Save button.
If you are uploading results for the training case, you will be able to see your score (see below). If you are uploading results for the validation case, you will not be able to see your score. For round 2, each team gets 10 uploads total. If you require more uploads, please contact us.
For the training case: After the upload is complete, your ROC curve will be computed automatically. A blue triangle in the State column next to the analysis name indicates that processing is ongoing, while a green circle indicates that it has completed. You will also receive an email notification once processing is completed. Upon completion, your score will appear in the Score column.
A report file will be generated showing a plot of the ROC curve and detailing the location of true positives and false negatives for each operating point. You can download the report in PDF format by checking the checkbox next to the analysis name and selecting Results > Get Report from the top bar.

You can also visualize the uploaded NIfTI volumes by checking the checkbox next to the PROCESS(Uploaded Data Processing) under your analysis name and selecting Results > Result Files from the top bar.

In the Files pop-up window that will open, check the checkbox next to the volume you want to visualize and and click on Visualize. The b=0 volume will be shown, overlaid with the tractography volume that you chose. (This is a way to check that your tractography volumes have the correct orientation.)

You can check your score for each of the two competitions in the Scoreboard section of the top bar. You can also check the total number of submissions for your team here. Good luck!
Finalize your submission
For your submission to be final, you have to upload results from both the training and validation data sets. For the training data, you can upload your results multiple times and check your score to fine-tune your processing pipeline and optimize its performance. For the validation data, you will not be able to see your score. The purpose of the validation data set is to apply the same tractography methods (with the parameters that you chose based on the training data) to a different injection/seed region from a different brain and examine the generalizability of the results.
Your submission is complete if you have uploaded, by the final submission deadline:
- Results from the training data.
- Results from the validation data.
- A 1-2 page description of your methods. This must be in PDF format and included in the zip file of your results from the validation data.
The method description must include any information that one would need to replicate your results independently. At a minimum, provide:
- Team name (as used to register)
- Full names and affiliations of all team members
- Sampling scheme(s) used (Cartesian grid or HCP two-shell)
- Details of the orientation reconstruction method or model (tensor, ball-and-stick, ODF, FOD, DSI, etc.) and any relevant parameters
- Tractography algorithm (local/global, deterministic/probabilistic, etc.)
- Seeding strategy (whole-brain/region-specific/other, number of seeds, etc.)
- Any additional masks that were used and how they were derived
- Software package and version, if any publicly available software was used
- References on any of the above, if previously published
- All of the above must be the same for the training and validation data.